Presta Web - FAQ
To log to Presta Web, using your Internet browser, go to the following address:
This website is accessible from any device connected to the Internet.
Choose the language from the list at the top right of the screen (English, French, Dutch).
Make sure you set your preferred language BEFORE logging in because you cannot change it once you have logged in. If you have chosen the wrong language, log out, change the language settings and log in again.

Click on “Login” at the top right of the screen. A window will pop up and prompt you to enter your username and password. Fill in the requested data and click on “Login”. If you have correctly entered your credentials, you will access the website.
When creating a user account, a default password is assigned to the username. When you first connect to the system, you will be asked to change your initial password.
If the user has already made this change but wants to change the password again, he can change his account settings:
If you cannot remember your password, click on “Password forgotten?”. You will be asked to enter either:
If the data is correct, an email will be sent to the entered email address (or to the email address linked to the entered username). This email contains a link to change your password.Please note that this link is only valid for 2 hours. If the validity of the link has expired, repeat the operation.
Clicking the link will prompt you to enter a new password. For safety reasons, we require you to choose a password that meets complexity rules. We added a password meter in order to analyse your password strength and indicate if the required level of complexity is met. When this is the case, confirm your password and finalize the process by clicking on “Update password”.
Use the “Calendar” module to prepare the payroll of the employees.
 i
i
i
i
i
i
i
i
i
i
i
i
i
i
i
i
i
i
i
i
i
i
i
i
i
i
i
i
i
i
i
i
i
i
i
i
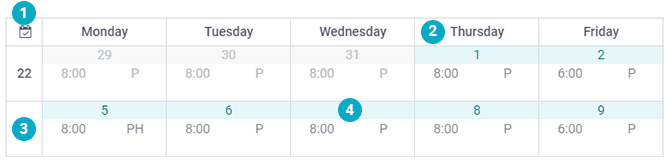
Calendars of the employees are automatically generated on the basis of their working hours, the holidays of the month or the leaves of absence entered in advance by your payroll officer. You have to confirm the performances and change only what needs to be changed.
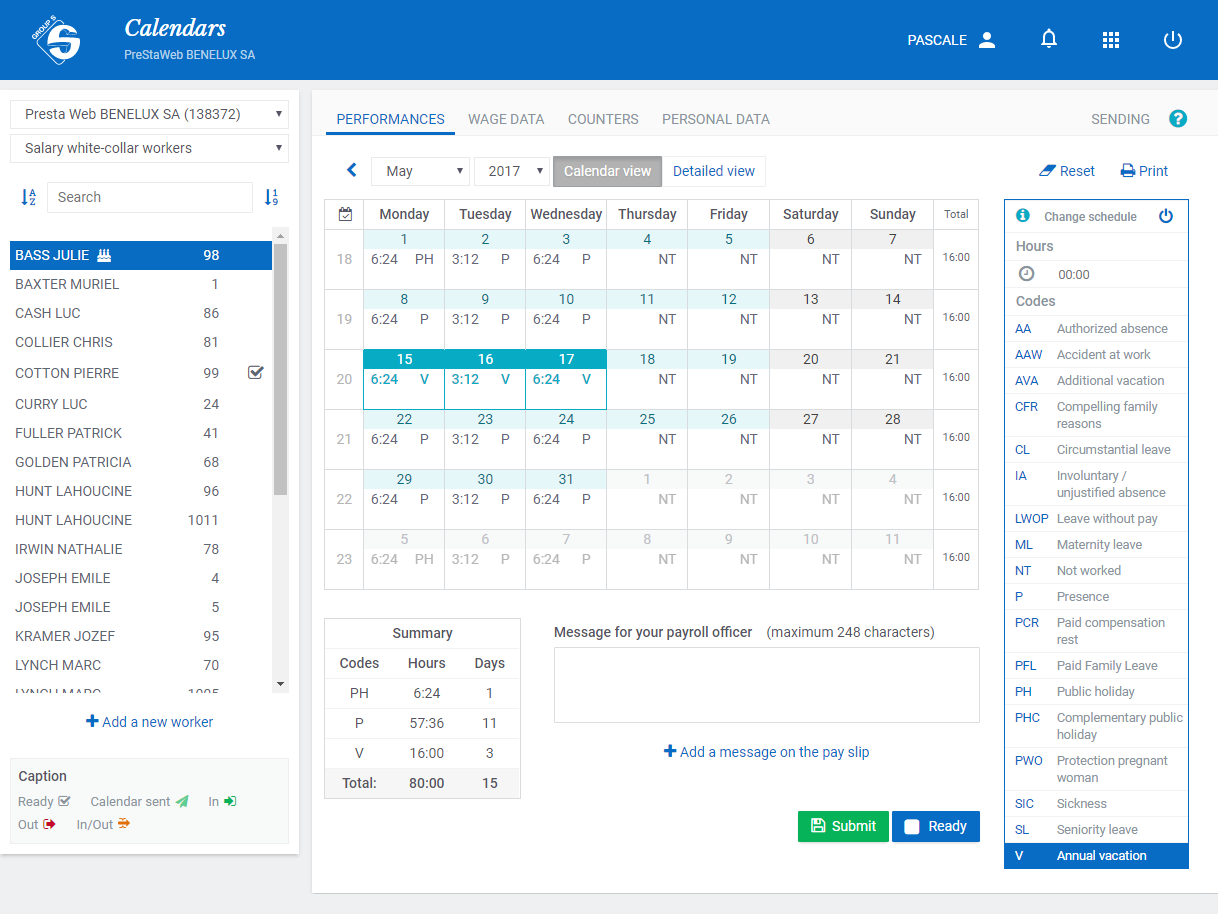
You can choose between the monthly view and the weekly view:

Select the appropriate code in the code range on the right side of the page. If you do not find a code in the list, ask your payroll officer to add it.
Then click:You also can directly enter the code in the calendar if you know it by heart.
The changes you made will be displayed in green.
The monthly view allows you to enter two performances per day.
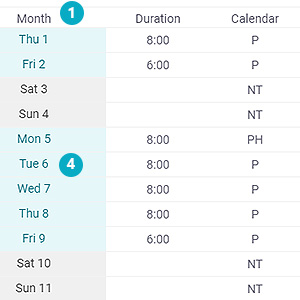
Click on a duration or a performance code to edit it.
When you type on the second line, the duration is automatically completed based on the hourly plan, taking into account the duration recorded on the first line.
Example :  Type 4
  Select a code and click on the second line
The weekly view allows you to enter more than two performances per day.
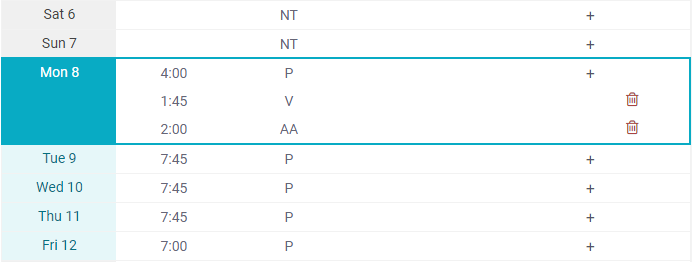
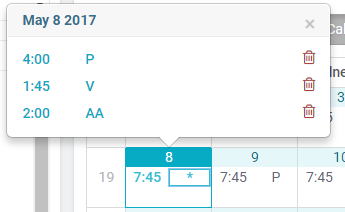
In the monthly view, if there are more than two performances for one day, the total duration of the performances is displayed and an asterisk (*) replaces the performances – to view the details of the day, click on the asterisk.
WARNING : make sure that the number of hours in the work day always matches the theoretical working hours. If the total of each day should be changed, it means that the employee has changed working hours and you should amend this data in his personal information.
If you have to provide additional information for an employee, please use the “Message for your payroll officer” field. You can type a message that will be sent to your payroll officer.
If you want to publish a message on the pay slip of an employee to, for example, give an explanation in case of exceptional treatment (correction, withholding on wage, etc.), click on “Add a message on the pay slip”, type your message and save.
When finished, you can click the 'Calendar complete' box. A ‘V’ appears in front of the name of the employee. This icon (not to be confused with that which confirms the actual sending of the data) only reminds you that you have completed the preparation.
WARNING : do not forget to save the changes when you have finished completing the calendar. Otherwise, changes will not be taken into account.
TRICK : the “Erase” button cancels all changes made to the calendar and you get back the original situation.
For your convenience, we have voluntarily limited the list of available performance codes. If necessary, you can ask your payroll officer to add more codes.
At present, it's not possible to enter a leave of absence in advance. Calendars are limited to the active period and the previous months. However, you payroll officer can enter these data for you.
The prepared wage data are displayed in black. To change them, replace the value to be modified.
When you modify or add wage data, they appear in green.
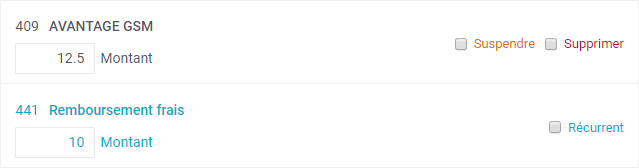
To add wage data, select a code in the available list and adapt the value in the appropriate column. Do not forget to save the changes. For your convenience, we have voluntarily limited the list of available wage components. If necessary, you can ask your payroll officer to add more codes.
 Click this button to cancel all changes and get back the previous situation.
 This icon indicates that you cannot change the wage data. Please contact your payroll officer to be allowed to change the data.
WARNING : Do not forget to save the changes when you are finished. Otherwise, changes will not be taken into account.
For your convenience, we have voluntarily limited the list of available wage components. If necessary, you can ask your payroll officer to add more codes.
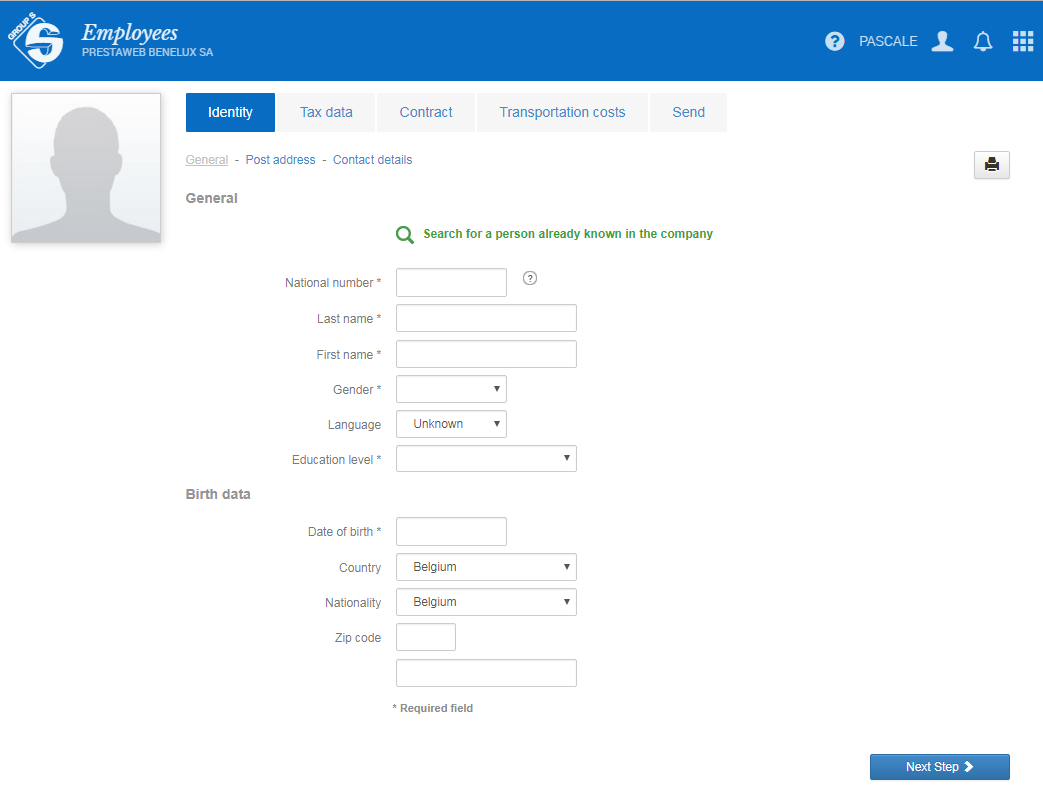
Go to the “Entry into service” module to add an employee to a population.
Click the button at the bottom of the list of your staff members to register a new employee. You will access a dynamic form which will prompt you step by step to fill in the required data.

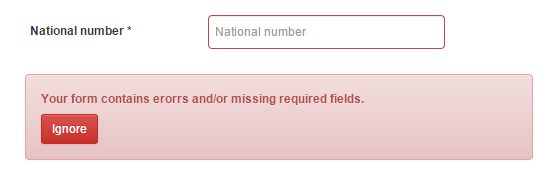
Mandatory fields are marked with an asterisk (*). If you skip a field or click on “Next Step” without completing a mandatory field, it will turn red and a message will appear prompting you to complete the missing fields. Please complete all mandatory fields in order to be able to save the data at the end of the registration process.
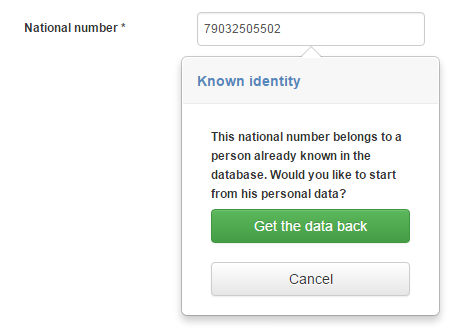
If the employee that you want to register already worked for you since you are affiliated with Group S, he/she will be known and we can retrieve his data. How to proceed?

Click on the search function to enter the first letters of his last name. If the system finds a match, simply select the person you are looking for and choose to retrieve the data in order not to have to fill in all the form.
TIP : always check the retrieved data as they could have changed in the meantime (change of marital status, address, etc.).
If the system detects that the national number that you typed has already been used in the past in the company, it will warn you and allow you to retrieve the data of the employee. You can then decide to retrieve the data (or not).
Choose a contract profile depending on the type of employee (white-collar worker, blue-collar-worker, student, etc.). Thanks to this selection, you do not have to enter redundant data such as Joint Committee, NSSO identification number of the employer, etc. In summary, the profile makes you save time when entering data.
A field defined within a profile cannot be modified afterwards.
Example : if you set that, for the student profile, the profession = “student”, there will be no way to change this data afterwards.
These profiles have been set up when creating the file, on the basis of the situation known at that time. Sometimes you may need to create a new profile. If this is the case or if the list of contract profiles is empty, feel free to contact your payroll officer.
The work time corresponds to the theoretical schedule of the employee within the company. It is defined in the employment contract of the employee.
On the screen, you have 3 options:

Once you have selected or created a schedule, its details will be displayed. You will see the details of the hours day by day (and the eventual details of career break hours).
Furthermore, this screen displays 6 additional fields.
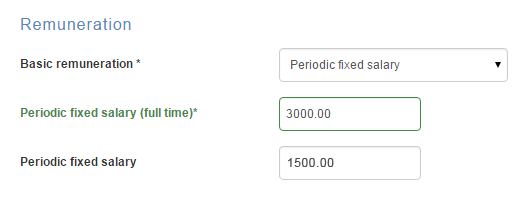
.When the employee gets a monthly salary, you can choose to enter his salary:
Depending on your choice, the other field will automatically be filled in on the basis of the schedule you have assigned to your employee.
Example : you hire an employee for 19 hours a week and grant him € 1.500 monthly gross wage. On the screen, you enter either the full-time wage (€ 3.000), or the distributed wage (€ 1.500). In one case as in the other, the second field will be completed.
WARNING : Always remember to respect the minimum wage the employee is entitled to. If you are not sure of the amount you intend to enter, please contact your payroll officer.
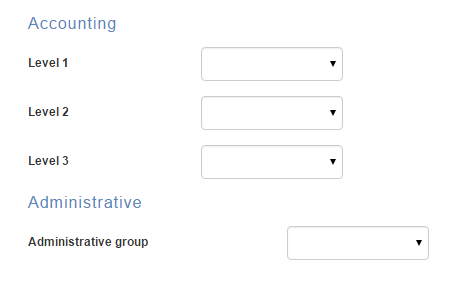
In this section, you can decide to assign an employee to an accounting level or an administrative group. It allows you to create populations or to do cost accounting where costs of your staff would be divided by cost centres.
These menus may be empty with no selection available. It is simply because they have not yet been defined within your company. It is not mandatory to fill in these fields.
If you want to use this functionality, please contact your payroll officer.
Does the employee belong to at least one population?
Presta Web is based on a population management system. According to certain criteria, the new employee belongs to a population. However, on rare occasions, you could create an employee who would not meet the criteria of any population. Because of this, he will not appear in the list of your employees. If this is the case, feel free to contact your payroll officer.
Does the contract of the employee begin in the future?
If the contract begins next month for example, it will only be visible after the payroll processing of the current pay period. The employee will appear in your list afterwards.
Have you filled in all the mandatory fields?
Mandatory fields are marked with an asterisk (*). If you skip a field or click on “Next Step” without completing a mandatory field, it will turn red and a message will appear prompting you to complete the missing fields.
Furthermore, at the end of the process, when you decide to send the data to your payroll officer, the system checks again if all mandatory fields have been completed. You will not be able to send the data if mandatory fields are missing.

Have you successfully passed all the verifications checks?
Wherever possible, we have integrated verifications checks to ensure the correct entry of the data. If an error is detected, a warning message is displayed. Make sure to correct the situation before proceeding.

Go to the module “Employees” to modify the data of an employee.
You can select an employee and change what it should be. Do not forget to save your changes before leaving the screen or switching to another employee.
WARNING: for security reasons, some data cannot be changed:
If the change is justified and necessary, please contact you payroll officer so that he can make the change.
TIP : if you change data that impact the payroll already calculated (e.g. wage change in the past), please inform your payroll officer so that he can make the necessary corrections.
The effective date indicates the start date of the changes made in the page.
If you want to amend the wage after the 15th of the month, you first have to indicate the 15th as the effective date, then modify the wage and click the "Send" button. A wage change during the month will result in a pro rata calculation of the old and the new amounts.
When you are finished with the payroll preparation, you just have to send your data. Doing so, you notify the payroll officer he can process the wages.


Once you’ve sent the last employee -or if you have sent the whole population at once-, a message will warn you that everything has been sent and that the next period (or a correction on the current period) won’t be accessible until the payroll has been processed by your payroll officer.
If the data have been sent to your payroll officer, any modification is temporarily forbidden. This allows your payroll officer to work on stable data. You can make corrections once the payroll has been definitively processed.
If corrections have to be made before the final payroll run, please contact you payroll officer.
Corrections are permitted on any month already processed by your payroll officer and after the start date of the file in Presta Web.
To correct an item:
If you click “Save”
This means that the correction is stored for later use (e.g. for the next payroll run). As during the active period, changes are saved but not yet sent to your payroll officer. As long as the correction has not been sent, a small blue pencil will be displayed in front of the name of the worker.

To send corrections, go to the "Sendings” menu, as you do for the payroll runs of the current month.
Corrections that have been saved but not sent are stored in separate sets. They are checked by default, in order to avoid you as much as possible forgetting them.
Once the correction is sent, a  appears in front of the name of the worker.

If you click “Send to the payroll officer”
This means that you want the correction to be done in the shortest time. Your payroll officer will be notified by email that a change has been made and that a payroll correction must be processed. This is a shortcut eliminating the need to save and then to go to the "Sendings” menu to directly send the correction.
TIP: feel free to add a comment before sending the data in order to let your payroll officer know what it is about.
By clicking the icon  , you open a screen that allows you to create a new schedule. Different pieces of information are needed:
After you filled in all required fields, just click the “Save” button.
Good to know : you can only create schedules spread over seven days. For a schedule spread over more than a week, please contact your payroll officer.
By clicking the icon  , you open a screen that allows you to search an existing schedule. This multi-criteria search can be performed based on:
Once you find the schedule you are looking for, click it to select it.